Cyn's artistic practice is guided by the concept of mushin no shin, or mindless heart. It is in this state that she paints from the depths of her soul, free from the constraints of conscious thought. Through her mindless heart approach, Cyn taps into a wellspring of creativity and emotion, resulting in artwork that is both deeply personal and universally resonant.
Read MoreEmbracing Imperfection: The Imperfect Beauty of Wabi-Sabi
In a world that often celebrates flawless perfection, Cyn's artwork stands apart by embracing imperfection. Drawing inspiration from the wabi-sabi Japanese principle, Cyn's paintings capture the inherent beauty found in the imperfect. Wabi-sabi recognizes the transient nature of all things and appreciates the beauty that emerges with the passage of time.
Read MoreFor The Love of Mother
For Mother’s Day this year (May 9, 2021), I am featuring this short film, Mrs. Honeycutt , that starred my mom as the central character. I, too, have a small role as well, so that was fun. If only everyone could have a bit of filmography to view-in loving memory-whenever they get a bit down and miss their mom like I miss mine. Mom, I love you and I miss you terribly.
Irma Rosemary Labella Macgregor, (1934-2019)
The truth is… as much as I wanted to watch this short movie, I couldn’t make myself do it. Sometimes the feelings are too raw to subject myself to memories I miss so much, even though I know a particular comedic moment in this film will have me giggling. I had good intentions when I thought about posting this. I thought it would make me feel closer to her and miss her less. It doesn’t. Maybe next year.
Women Supporting Women (WSW) Artsy Trading Card Project
Sip & Talk with BPW ladies (updated 04/21/2021)
Let’s take some time during our lunch break to support each other and have some creative fun! Artist trading cards are a thing... but you don’t have to be an artist to have fun with them. Then we will break into groups of 2 and have a quick 5-minute chat about what your favorite color(s) are and why and/or answer the prompt: What is one positive gift 2020 gave you? The purpose of this activity is to connect with one another, be mindful that imagination is more important than knowledge, and have a grateful heart for our community. Now let’s get started.
AND DON’T WORRY!
I’ll be walking you through all of this and there are no great expectations in the art department. The main thing is for all of us to be together and have fun!! If you can make a cup o’tea or have a beverage or snack nearby that would be awesome!
Supply List
Download my “ Lovely words” list here> download. Or don’t use words at all! Supplies marked with * are the most important to have.
*Glue stick, liquid glue (white or clear), or tape
*Cardboard or thick paper is best - The final size will be 2.5in x 3.5 in
*Glue-able stuff of any kind. Old magazines, paint chips, fabric or wallpaper samples, old holiday or birthday cards, paper receipts, music sheets, anything that can be glued. **** I ran around my house and found a tea package, a candy bar wrapper, a dried eucalyptus leaf, a scrappy brown paper bag, aluminum foil, an old box label, a match stick, and a fabric sample swatch. I also turned my handbag upside down and found a treasure trove, sadly :(, not sad ;)***
*A pencil or pen
Scissors (actually the little scissors in a sewing kit could work really well! and also you could tear things instead of cutting)
Colored pens/pencils, crayons, markers, highlighters
Bowl of water or wet paper towel
Paper towel
Sense of humor
The Plan
The plan is to create 3 WSW Artsy Trading Cards. You will choose one of the cards to trade with your discussion partner using her prompt answers to help you make the card just for her. You can share the Trading Card with your discussion partner the next time you see them in person or you can send the trading card to them via snail mail. You can make a few trading cards and decide which one you’d like to give or you can make a few and gift a couple to other special people in your life. I am here just to get you started.
The way we are going to do this is by creating a Collage. By definition, a collage is a piece of art made by gluing/taping/stapling various materials such as photographs, found objects, and pieces of paper or fabric onto cardboard or paper. The only rule for trading cards is the size. All Trading Cards are 2.5 in x 3.5 in. the size of a playing card. BTW, other things that are similar in size are:
A sheet of letter paper folded in half 3 times
Now let’s break into groups of 2 and have a quick 5-minute chat with your discussion partner. During this time you will want to have your active listening hat on. Ask each other what your favorite color(s) are and why and/or answer this prompt: What is one positive gift or lesson 2020 gave you?
If you usually have trouble getting started with blank paper here are a few ideas:
Use the word list I made—-you can download it here—- and then print it out. You can use the printed paper to cut out the words that best describe your partner’s personality or vibe. You’ll paste the words onto your card later.
Start by finding paper or use a colored pen, marker, crayon that represents your partner's favorite color.
Write her name on the card, using large lettering, in a fancy way, or repeat her name as a pattern.
Just doodle for a bit.
“The role of the creative leader is not to have all the ideas; It’s to create a culture where everyone can have ideas and feel they’re valued. ”
DETAILED Instructions for Creating the Cards
Rough cut the cardboard base
There is ONLY one RULE for this project. The final size of the trading card should be 2.5 x 3.5. The size of a playing card. BTW, other things that are similar in size are:
Mobile Phone, kinda
A sheet of letter paper folded in half 3 times
If you have a ruler that will help but don’t fuss over this, just do the best you can.
Get your materials ready
Decide on your colors and shapes and how you plan to do your card. Have your materials ready.
Draw a quick sketch of your plan
Take some time to do a rough design of your layout on a blank sheet of paper if this helps you.
Cut the words or images out, trim up fabric, ribbon, or rip-up/cut paper to fit your layout
If you have all the pieces handy you can play around with the layout until you see something you like.
Start gluing in place
Once you have a layout that makes you happy, start gluing down the base paper, color, found objects. We will lay down larger bits of paper first and then layer over that smaller bits and marks.
Start gluing in place
Have fun with this! No rules.
Keep layering
Glue other bits and pieces over the base layers to create texture and interest. If you have colored pencils, crayons,or markers, you can doodle on the card making shapes that are meaningful or abstract...or both! That’s what I do.
Finish
When you feel ready to say it is finished, let it sit to relax a bit and come back to it later. Tidy up the edges and spray the top with fixative, gloss spray, or even hair spray! When you are finished and the card is dry, wrap it in a piece of tissue paper or kraft paper and tie with a ribbon. It’s now ready to swap. Yay!

Flower Power
A digital Artist Trading Card by Cyn.
UPDATED! MY STUDIO SUPPLIES LIST - VEGAN STYLE
To keep with my vegan lifestyle, I double-checked that the supplies I use in my projects were in fact vegan. I found that I will need to edit some of the products already residing in my studio. Going forward the list below will guide the buying decisions for my studio supplies. I ran across this website that did the product investigation already, so all I needed to do was to confirm what in my existing stock was vegan and make a purchasing plan for future supplies. I like keeping things simple, so I looked for brands that were consistently vegan in their philosophy and products. That turned out to be more difficult than I originally thought as many brands had exclusions to this or that. By the way, most Ivory Black and Paynes Grey are made from charred cow bones.
UPDATED 6/11/23- Looks like Colors of Nature a Canadian vegan artist supplier is out of business. So I am looking for an alternative now.
Disclaimer: This website uses affiliate links, meaning: at no additional cost to you, we earn a small commission if you click through and make a purchase. As an Amazon Associate, I earn from qualifying purchases. I only feature products that I believe in.
Your support means the world to me! Thank you so much!
Here is my supply list of preferred brands that are vegan and/or non-toxic. I’ll update this list as new information becomes available. If you know of any sources or perhaps something on this list that isn’t really vegan, comment below. Would love to chat with fellow plant lovers!
Acrylic Paint
-Winsor & Newton Artist and Galeria (Except for Ivory Black and Payne's Gray.)

Watercolor
-Daniel Smith: Essentials Mixing Watercolor Set
-Kuretake Gansai Tambi
-Maimeri Blu [except for 484 Van Dyck Brown, 486 Sepia, 514 Payne’s Grey, and 535 Ivory Black]
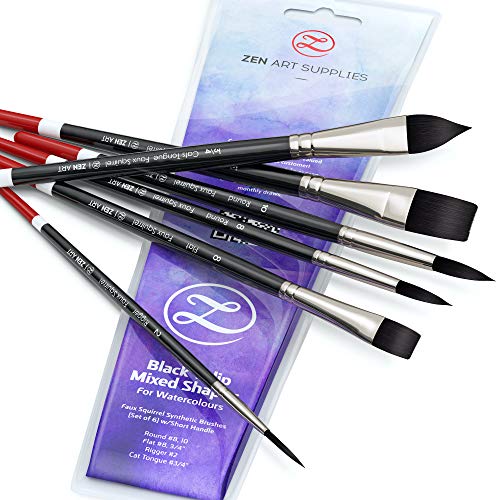
Brushes
-Acrylic and oil: Mimik Hog Professional Synthetic Hog Bristle Brushes
-Watercolor: da Vinci Watercolor Series 5386 Casaneo Paint Brush Set, New Wave Synthetics AND Faux Squirrel Artist Watercolor Brushes
Canvas
-Blick Premier Artists' Panels and Gallery Wrapped up to 16 x 16
-(Still looking for a stretched canvas for sizes 18 x 18 - 40 x 40)
Charcoal
-Winsor & Newton Artist Vine Charcoal Sticks

Gesso
-Natural Earth Paint-Eco Gesso Kit [The full kit makes 50 fl. oz. of gesso, which is enough to prime about 10-15 medium-sized canvases]
-Golden GAC Acrylic Polymer Mediums
-Daniel Smith
Masking Fluid
-Talens Royal Liquid Masking Film
-Daniel Smith

Oil Paints
- Natural Earth Refined Walnut Oil
-Natural Earth - The Complete Eco-Friendly Oil Paint Kit
-Colors of Nature - Out of Business
Pastels
-Colors of Nature - Out of Business
Pigments
-Natural Earth
-Colors of Nature - Out of Business
Sizing
-Gamblin PVA Size. [More archival than rabbit glue]
Tape
-IPG White Artist Tape
Watercolor Paper
-Stonehenge Aqua Watercolor Block, 140lb. Coldpress, 10 x 10
-Moulin Du Roy Block 140Lb Hot Press

Finding a place to be my artist self - part one
No one really tells you how to do this. Or maybe that was just my experience. #Instagram shows lovely studios by working artists and it seems so effortless and magical. So what really happens when you decide to set up your studio?
FIRST YOU NEED TO FIND THE SPACE
It happened for me this way. This past summer, I was at an arts conference and happened to mention to a friend and fellow artist that I would love to find an affordable space to make art. You know some kind of space that could be called an artist studio. I was flexible and wasn’t too picky, or so I thought. We chatted about that and a few other issues and said goodbye. A few days later he messaged me and said he had a friend who was leaving their space and would I like to take a peek at the space. He said “oh yeah, it’s also affordable”. I made the call.
MY STUDIO WISH LIST
I’m a pretty flexible gal, so at first my wish list looked like this:
10x10 space at a minimum
Heat and A/C
No more than a 10 minute drive from home
Easy access to water
Safe
As I investigated the options I came to realize a few things.
If 10x10, my goodness, I needed a window with some natural light. I have a sensitive nose, so the space had to pass the nose test. I didn’t care about the walls or the floors, I figured I would be messing them up anyway. Noise. Ok I had not even thought of this let alone have it on my list! So my updated list now looks like this:
10x10 space at a minimum
Heat and A/C
No more than a 10 minute drive from home
Easy access to water
Safe
Smells healthy
Window
Low noise (no industrial drills or loud music)
So back to my investigation for the space, I found the gentleman who was renting a few offices had a few choices. One space had a sink and water, but no window. It felt a bit like a jail cell, so this freaked me out a little. The other space didn’t have a sink or water, but was next to the ladies bathroom, and it had a window! The floor was crappy, ok. And they had painted the walls bright white. OK great! The window needed an updated shade, no biggie. I was pretty satisfied that this space would work for me. Then I heard the drumming.
It turns out the guy down the hall practices with his drums. As in rock band drumming. The agent told me he only came to the office during the evening hours, so this shouldn’t be a problem. Mmmmmm.
SEALING THE DEAL
I was ready to make the deal happen. It took several months before I could officially move in. In that time, the office I thought I was getting, ended up being a different one, which was fine since it had 2 large windows that suited me just fine. They installed some manufactured wood floors, very nice, but yikes, now I had to protect them! And they also installed some very nice vertical blinds. In addition, this office was located next to a storage place, so I also got a 10 x 5 unit to store all my extra art supplies that didn’t fit in my studio space. This is how my final wish list looks now:
10x10 space with 10 x 5 storage unit nearby
Heat and A/C
A 20 minute drive from home
Easy access to water in the ladies room
Safe, I have to keep my wits about me
Smells great in office. The storage unit has an odd smell, but not that bad
2 Windows
New flooring
New vertical blinds
I have a neighbor who plays the drums during the day. Luckily he is good!
A business address
I moved in Nov 30, 2018. This was by far the best action I took in 2018 to move me forward in my work. I love having a special space for making art. I created the space so it can be flexible so I often do the business side of my work in the studio too. So far this little space works for me.
In part two of The Making of a Studio I’ll talk about how I actually set up the space.